Hydraulic & Mechanical Snubbers

test service nolan

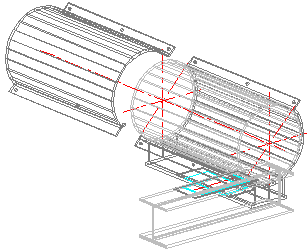
INSTALLATION OF HYDRAULIC SNUBBERS:

STEP 1: Check that front paddle is securely fastened to the piston rod. If loose, tighten the connection by means of holding the piston rod on the wrench flats provided and tightening the paddle against it. DO NOT use a pipe wrench on the chromed shaft of the rod. Try to minimize the amount of rotation of the piston rod within the cylinder to prevent possible scoring or seal damage. Torque the connection to between 15 and 25 ft-lb. for all cylinder sizes.

STEP 2: If required, attached the extension piece to the rear of the cylinder or check the torque of the nuts if already assembled. Note: When tightening the extension piece nuts, use a wrench on the tie-rod nuts at the piston rod end of the cylinder to apply a counter-torque. If this procedure is not followed, the cylinder tie rods will loosen. Torque the nuts to the valves listed in the chart below.

CYCL SIZE (KIPS)
BORE SIZE (INCHES)
THREAD (UNC)
TORQUE
(FT-LB.)
3
1.5
3/8 — 16
30
10
2.5
1/2 — 13
60
20
3.3
5/8 — 11
100
30
4.0
5/8 — 11
100
50
5.0
7/8 — 9
230
70
6.0
1 — 8
300
130
8.0
1 1/4 — 7
700
200
10.0
1 3/4 — 5
1500

STEP 3: Consult the hanger detail to determine the required as-built cold pin-to-pin dimension. The extension piece comes equipped with a threaded rod connection to accommodate field length adjustments. Sight holes are provided in the extension pipe to ensure proper thread engagement. The male threads must be visible through these holes for proper load-carrying capability. A lock nut is provided to freeze the adjustment. Torque to 50 ft-lb. for all cylinder sizes. For hanger assemblies not equipped with extension pieces, field length adjustment must be accomplished by repositioning the supporting structures or the cylinder cold set. Approval of the new cold set by Shaw FCI should be obtained.

STEP 4: Orient each end attachment or pipe clamp to ensure that the available alignment provided by the ball bushings is within the allowed 10-degree cone of action.

STEP 5: Hoist the assembly into place. Cylinders equipped with remote reservoirs can have the reservoir decoupled at this time, provided it will not be necessary to reposition the cylinder piston rod during installation. Reconnect the reservoir after the assembly has been pinned in place. NOTE: Due to the pressurized design of Shaw FCI reservoirs, there is no concern for orientation, as it will function properly in any spatial orientation. It is recommended that the elevation of the remote reservoir be at or above that of the main cylinder.

The load pins provided with the assembly fit into close tolerance holes for which care must be exercised during installation. Removal and insertion should be accomplished carefully and without undue force. Spacer washers are provided to ensure proper function of the ball bushing alignment feature. The load pins are provided with cotter pins which must be securely installed. Any relocation of the assembly to clear an interference should be brought to the attention of the project engineer. Adherence to project tolerance guidelines should be observed.

STEP 6: Remove and discard the piston rod locking clamp (if supplied). Recheck all bolted connections. For units supplied with remote reservoirs, ensure that proper connections are made and that the flexible hose is free from kinks. Visually examine the entire assembly for erection damage, paying particular attention to the chromed surface of the piston rod. This completes the installation of the assembly.

To Maintain Hydraulic Snubbers

Under normal operating conditions, hydraulic snubbers are maintenance-free. In severe service (usually involving excessive vibration or high temperatures), the seals may become damaged, causing a loss of fluid. In this case, the snubber must be completely disassembled, new seals must be installed, and the snubber must be refilled with fluid.


INSTALLATION OF MECHANICAL SNUBBERS

First, the snubber must be set at the cold position. Under normal operations, the snubber will extend in the positive direction from the initial (cold) position to the operating (hot) position. In rare installations, the snubber may be expected to move in the negative direction by some known amount. The cold position must be set so that the snubber will never closer than ½ to 1 in from the end of its stroke. In most cases, this means that the cold setting will be ½ to 1 in from one end of its stroke range. At the operating conditions, the snubber should have at least 1 in of possible travel. The snubber should be installed with its axis parallel to the direction of the expected impulsive load. This may or may not be the direction of thermal movement. If the two movements are not in the same direction, there are some additional installation considerations. In this case, the snubber should normally be ordered with ball joints at both ends, as shown in the diagram below. The snubber should be mounted so that the major expected thermal movement is in the plane of the ball joints. The overall length is adjustable from 2″ to 6″ by means of the threaded rod on the extension end of the unit.

Mechanical Snubber Diagram

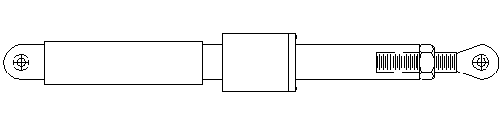
CAUTION: Do not use the piston side threaded rod end for adjustment. Full thread engagement is critical for safe operation.

To Install Mechanical Snubbers

1. Determine the direction and magnitude of thermal motion and impulse load. Adjust the snubber so that after the thermal expansion, the snubber will be in the middle of its travel range. Temporarily install the unit in the operating position. Tack weld end brackets to the fixed structure and to the pipe that it is to control. For units furnished with a pipe clamp connection, install the clamp at this time (CAUTION: Do not allow weld spatter to contact the snubber unit). After tack welding, remove pivot pins from both ends of the snubber assembly, set the unit aside, and complete welding. Tighten pipe clamp bolts if applicable. Reinstall the snubber assembly between the end brackets and replace the pivot pins and cotters.

2. Installation is now complete, and the snubber assembly is ready for operation.

Expansion Joints

test service nolan

• Installation
• Post Installation Inspection Before Test
• Inspection During and After Test
• Periodic Inservice Inspection
• System Operation
• Typical Causes of Expansion Joint Failure
• Installation Misalignment
• Squirm or Instability

Pipe Expansion Joints: Do’s and Don’ts  From the “Standards of the Expansion Joint Manufacturers Association, Inc”

Do’s

Dont’s

  • Inspect for damage during shipment, i.e., dents, broken hardware, watermarks on carton, etc.
  • Store in a clean dry area where it will not be exposed to heavy traffic or damaging environment.
  • Use only designated lifting lugs.
  • Make the piping systems fit the expansion joint. By stretching, compressing, or offsetting the joint to fit the piping, the joint may be overstressed when the system is in service.
  • It is good practice to leave one flange loose until the expansion joint has been fitted into position. Make necessary adjustment of loose flange before welding.
  • Install joint with arrow pointing in the direction of flow.
  • Install single Van stone liners, pointing in the direction of flow. Be sure to install a gasket between the mating flange and liner.
  • With telescoping Van stone liners, install the smallest I.D. liner pointing in the direction of flow.
  • Remove all shipping devices after the installation is complete and before any pressure test of the fully installed system.
  • Remove any foreign material that may have become lodged between the convolutions.
  • Refer to EJMA Standards for proper guide spacing and anchor recommendations.
  • Do not drop or strike carton.
  • Do not remove shipping bars until installation is complete.
  • Do not remove any moisture-absorbing desiccant bags or protective coatings until ready for installation.
  • Do not use hanger lugs as lifting lugs without the approval of the manufacturer.
  • Do not use chains or any lifting device directly on the bellows or bellows cover.
  • Do not allow weld splatter to hit unprotected bellows. Protect with wet chloride-free insulation.
  • Do not use cleaning agents that contain chlorides.
  • Do not use steel wool or wire brushes on bellows.
  • Do not force-rotate one end of an expansion joint for alignment of bolt holes. Ordinary bellows are not capable of absorbing torque.
  • Do not hydrostatic pressure test or evacuate the system before installation of all guides and anchors. Pipe hangers are not adequate guides.
  • Do not exceed a pressure test 1-½ times the rated working pressure of the expansion joint.
  • Do not use shipping bars to retain thrust if tested before installation.
  • Pipe hangers are not adequate guides.

Refer to EJMA Standard for proper guide spacing and anchor recommendations.
NOTE: The manufacturer’s warranty may be void if improper installation procedures have been used.

Pre-Insulated Pipe Supports

test service nolan

Clean the pipe following the pipe cleaning procedure explained in Note #2. Clean the pipe for the length of the shoe plus 3 inches on either side of where the shoe will be installed. Put the slide plate on the structural support member and center it on the centerline of the pipe. Remove the slide plate and check the surface of the structural support member below for bumps or high points. Remove any that are found. Replace the slide plate and weld the mounting plate to the structural support member as shown. Protect PTFE, 25% glass-filled, with duct tape or equivalent during welding. Clean the bottom half of the insulation. For cold shoes, the polyurethane should be prepared for bonding by sanding it lightly with 60-grit sandpaper.
Pre-insulated Pipe Supports Installation & Maintenance 1

For cold shoes, apply .042 to .080 inches of a wet film thickness of adhesive (Fosters 82-77) to the inside of the insulation, as per the manufacturer’s instructions. Slide the assembly under the pipe into position above the slide plate, which is mounted on the structural support member (See Note #1 for the desired location). Note that field trimming of the calcium silicate may be required for a proper fit to the pipe circumference. Lower the pipe onto the bottom half of the saddle.
Pre-insulated Pipe Supports Installation & Maintenance 2

Clean the bottom half of the insulation. For cold shoes, the polyurethane should be prepared for bonding by sanding it lightly with 60-grit sandpaper. For cold shoes, apply .042 to .080 inches of a wet film thickness of adhesive (Fosters 82-77) to the inside of the insulation, as per the manufacturer’s instructions. Slide the assembly under the pipe into position above the slide plate, which is mounted on the structural support member (See Note #1 for the desired location). Note that field trimming of the calcium silicate may be required for a proper fit to the pipe circumference. Lower the pipe onto the bottom half of the saddle.
Pre-insulated Pipe Supports Installation & Maintenance 3

Align the clamping holes of the top half to the bottom half of the saddle, and press them together. Seal longitudinal joints and the overlapping ends of the jacket with a suitable sealant such as Foster’s Flextra 95-50 or equivalent. Install the clamping bolts, lock washers, and nuts. Hand-tighten first, check the alignment of the saddle and position. When found correct, tighten the nuts by applying the required torque specified in the drawing.

NOTES:

1. Cold Setting:
• For an axial cold setting, position the support assembly such that after the support has moved, the centerline of the slide plate approximately matches the centerline of the support.
• For lateral cold setting, center the support assembly over the slide plate.

Pre-insulated Pipe Supports Installation & Maintenance 4

2. Pipe Cleaning Procedure:
• The pipe shall be cleaned before the application of the adhesive. Carbon steel pipe should be solvent cleaned and allowed to dry. Stainless steel and high alloy pipes, which have been primed, shall have the primer roughened with a hand tool or power tool, followed by solvent cleaning.
• When used in cryogenic applications (below -40oF), the metal surface must be sandblasted or primed with polyamide epoxy primer.

Maintenance & Storage Instructions for Insulated Pipe Supports (Cold Shoes)
1. Do not unpack the cold shoe unless the support is ready to install.
2. Store all cold shoes at a site where the cold shoe components are not exposed to ultraviolet rays.
3. Coat all exposed surfaces of high-density polyurethane foam with monolar mastic in a well-ventilated area.
4. Wrap all cold shoes and Polyurethane bases with black plastic.
5. Protect all cold shoes from outside moisture, especially rainwater.

Recommended Storage – Covered area, preferably a warehouse or, at a minimum, under a tarp, above ground, left in original packing until use.

Standards & Specifications

test service nolan

Piping Technology & Products, Inc. and its wholly owned subsidiaries, U.S.Bellows, Inc. and Sweco Fab, Inc. are committed to the continuous improvement of our products and services. We understand the industry challenges we eagerly serve not only our external customers but also internal customers as well. Viewing ourselves as part of a team which includes our customers and suppliers, we understand our role in meeting the team’s goals. We plan and execute our work to meet our customers’ specifications. Working together we strive to…”DO IT RIGHT THE FIRST TIME”.

 QUALITY SYSTEMS

  • ISO 9001, ASQC Q-92, CAN3 Z299

DESIGN

  • ASME B31.1, ASME B31.3, ASME Section VIII Pressure Vessels

MANUFACTURING

  • MSS
SP-58, SP-69 and SP-89
Pipe Hangers and Supports
  • AWS
D1.1
Structural Welding-Steel
  • ASTM
A36
Structural Steel
A53
Welded and Seamless Steel Pipe
A120
Black and Hot Dipped Zinc-Coated Steel Pipe
A123 and A446
Zinc Coatings on Steel Fabrication
A125
Helical Steel Springs
A153
Hot Dipped Zinc-Coated Hardware
A307 and A325
Bolts and Studs
C916
Adhesives
D1621, 1622, 1623
Cellular Plastics
  • EJMA
Sixth Edition 1993
Expansion Joints
  • Steel Structures Painting Council, Vol. 1&2 and ISO 8501-1
  • Industrial Fasteners Institute, IFI-122 Metric Fastener Standards

TESTING

  • ANSI
B18.2.3
Screws, Nuts and Bolts

Customer Portal

test service nolan

C-Type Constant Spring Supports for a Refinery in Texas

test service nolan

C-Type Constant Spring Supports for a Refinery in Texas

Type: Constant Spring Supports
Size: 25″ in Height x 17-38″ in Length x 11-5/8″ in Width
Material: A-36 Carbon Steel with HDG Finish
Design: 981 lb. to 1828 lb. load | 2-1/2″ to 3″ Vertical Movement Range
Testing: Standard Load and Travel Testing per MSS Standards

Piping Technology & Products, Inc. designed and manufactured C-type constant spring support assemblies for a refinery in Texas. The constants are 25″ in height, 17-3/8″ in length, and 11-5/8″ in width. Their load capacities range from 981 lb. to 1828 lb., with a vertical movement ranging from 2-1/2″ to 3″. All constants were fabricated from A-36 carbon steel with a hot-dipped galvanized finish, and underwent standard load and travel testing per MSS Standards prior to shipment.

Top